This guide will help you quickly set up your Keyword-based Autoresponder Android App in three simple steps. Follow each step to ensure your auto-reply system works efficiently.
Step 1: Add/Edit Auto Replies
- Create a New Auto Reply:
- Tap the “+” icon to start creating a new auto reply.
- Assign a name to your auto reply for easy identification.
- Input Your Auto Reply Message:
- Enter the message that will be automatically sent when a specific keyword is received.
- Add the keyword(s) (separate by commas) that will trigger this auto reply.
- If you want the app to recognize keywords when they appear within a message, select the checkbox.
- Organize Your Contacts:
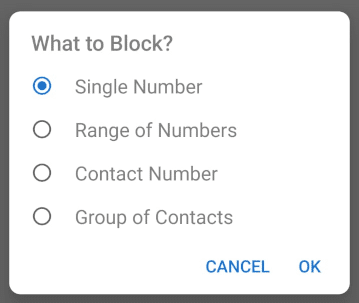
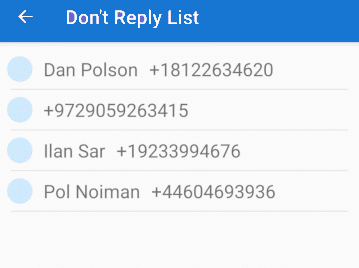
- Do Not Reply List: Add phone numbers or ranges of numbers here to ensure they do not receive auto replies.
- Communicate Using Multiple Marketing Channels:
- Reach out to your customers, suppliers, employees, dealers, and distributors using the most appropriate channels for each group.
- Meet Your Customers On The Channel They Prefer:
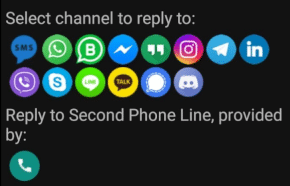
- Choose from a variety of communication channels such as SMS, WhatsApp Business, Facebook, Telegram, Instagram, LinkedIn, Viber, Skype, Hangouts, Line, KakaoTalk, and more.
- Save Your Settings:
- Tap the “Save” icon to apply and save all changes.
Step 2: Set Time for Auto Replies
- Select an Auto Reply Profile:
- Use the dropdown list to choose the auto reply you want to apply for different scenarios.
- Schedule Your Auto Replies:
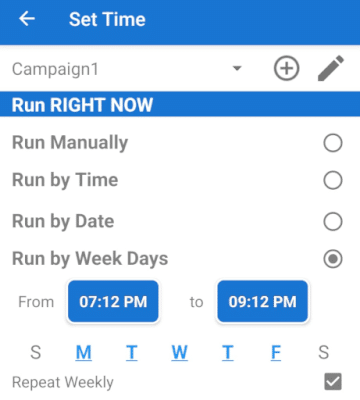
- Manual Triggering: You can manually trigger auto replies without setting a schedule, giving you flexibility when needed.
- By Time: Set specific times during the day for your auto reply to activate.
- By Weekdays: Choose specific weekdays for your auto reply to run, with the option to repeat weekly.
- By Date: Schedule auto replies for particular dates, such as vacations or holidays.
Step 3: Turn Auto Replies ON/OFF
- Activate or Deactivate Auto Replies:
- From the list of auto replies, select the one you want to activate or deactivate.
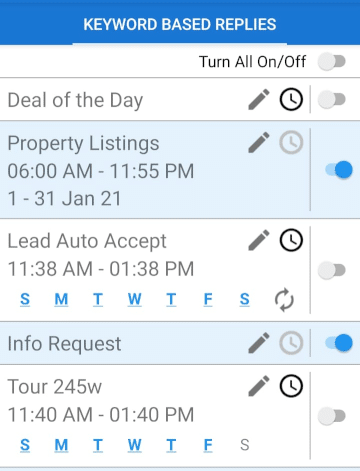
- Use the toggle button on the right of the reply to switch it ON or OFF.
- The button will change color when the auto reply is active.
- An outlined arrow icon will appear in your phone’s notification bar to indicate the active auto reply.
- Monitor Auto Reply Activation:
- Once activated, the auto reply will wait until the scheduled start time.
- When the auto reply begins, the background color of the app interface will change to signal that it’s active.
- The outlined arrow icon in the notification bar will change to a fulfilled arrow icon when the reply is in operation.
By following these three simple steps, you can efficiently set up your Keyword-based Autoresponder Android App to automate your communication and enhance your customer engagement. The app is affordable, starting at just 43 cents per day (even less with annual payments), making it a cost-effective solution for businesses of all sizes.
Customizing Your Keyword based Auto Replies
Editing Auto Replies
How to Pair Keywords and Auto Reply Messages.
Best Practices for Pairing Keywords and Messages.
Importing Auto Replies.
Customizing Your Auto Reply Message.
Managing the ‘Do Not Reply’ List
Scheduling Auto Replies.
Manually control your auto replies.
Setting Auto Reply by Time.
Setting Auto Reply by Dates.
Setting Auto Reply by Weekdays.
Turning Auto Replies ON / OFF.
Notification Icons for Auto Reply Status.
Granting Access to Notifications .
Settings: Auto Replies Configuration.
SMS General Reply Rules.
SMS Auto Reply Rules.
Social Messenger Rules.
Managing Auto Replies Reports.
Accessing and Managing Reports.
Exporting Data from Reports.
How to Transfer Files from Android to PC.
Back Up Your Settings and Configuration.
Effective Bundle of 2 Autoresponder Apps.
Building a Chain of Keywords:
Editing Auto Replies:
How to Pair Text Keywords and Auto Reply Messages
Integrating text keywords with auto-reply messages is an essential strategy for engaging customers and automating communication. Here’s why you should incorporate SMS keywords into your communication efforts:
- Engagement: Text keywords encourage customers to participate actively. They can initiate interactions simply by sending a keyword, prompting an automated response.
- Personalization: By using SMS keywords, businesses can tailor responses based on the exact keyword received, ensuring the reply is relevant to the customer’s query.
- Lead Generation: SMS keyword service allows businesses to capture valuable customer data like phone numbers and preferences, supporting lead generation and follow-ups.
- Automation: A key benefit of SMS keyword campaigns is automation. Automating responses to customer inquiries not only saves time but also ensures a consistent, timely reply every time.
Best Practices for Pairing Text Keywords and Auto Reply Messages
To maximize the effectiveness of your SMS keyword service, consider the following best practices when pairing SMS Keywords with Auto-Reply Messages:
- Keep Keywords Relevant: Choose SMS keyword terms that are directly related to your products or services, and that align with the action you want your customers to take. Avoid using generic keywords; instead, opt for specific, memorable keywords that relate directly to your offerings.
- Craft Compelling Messages: Make sure your auto-reply messages are clear, concise, and engaging. Your message should provide value and encourage customers to take further action, whether it’s exploring your products, signing up for promotions, or contacting you for more information.
- Promote Keywords Actively: Share your text messaging keywords across multiple marketing channels: your website, social media, email newsletters, business cards, and advertisements. This will encourage customers to text the keyword to your number and engage with your brand.
- Monitor and Adjust: Regularly monitor your SMS keyword campaigns to see how they’re performing. Use analytics to measure engagement, customer feedback, and conversion rates, and then optimize your keywords and auto-replies accordingly.
Importing Auto Replies
Follow these 4 steps to import your auto-replies into the Keyword-based Marketing Autoresponder:
Step 1: Prepare the Data to be Imported
To start importing, first prepare your data in the correct format. Please ensure that the CSV file is formatted as follows:
- The first row should contain the necessary headers for mapping fields.
- ALL FIELDS ARE REQUIRED – Your .CSV file must contain all required fields, including the keyword, message, and any other necessary data.
Step 2: Export Data from Excel to CSV Format
To export data from an Excel worksheet to a CSV file:
- Open your Excel file and go to File > Save As.
- In the Save as Type box, select CSV (Comma delimited) (*.csv).
- Choose where to save the new file and click Save.
- Confirm the selection and close the Excel file. A dialog box will appear to inform you that only the current worksheet will be saved. Click OK.
To diagnose errors in the CSV file, open it in a text editor like Notepad++. This allows you to verify the format and ensure there are no issues with the file before importing it.
Step 3: Transfer the CSV File to Your Android Device
To transfer the CSV file to your device:
- Connect your phone to your computer using a USB cable.
- Unlock your phone and select File Transfer under Use USB for.
- Copy the CSV file to a desired folder on your phone.
- After transferring, safely eject your phone from the computer and unplug the USB cable.
Step 4: Import Your Auto Replies
There are multiple ways to open the Import dialog:
- Go to the app menu and tap Import Replies from CSV file.
- Or, go to the Add/Edit Screen and tap the Import icon in the upper-right corner.
Once you’re on the Import Screen:
- Choose whether you’d like to automatically create a time profile (24/7) for each auto-reply.
- Select if you’d like to turn on all imported auto-replies.
- Click the Import button and browse for your CSV file.
- Select the file and double-click (depending on your device) to initiate the import.
- The import process will begin automatically. Once complete, you will see a confirmation message. If there are any issues, an error message will appear at the bottom of the screen.
Customizing Your Auto Reply Message
Once your auto replies are set up, you can easily customize them for personalization:
- Access Message Customization:
- Navigate to the Add/Edit screen.
- Tap the magnifying glass icon within the message field to start editing.
- Personalize Your Message:
- Insert nametags (first or last names) into your auto-reply message. This makes the response feel more personal, especially if you are replying to existing contacts.
- Choose where in the message you want the nametag to appear.
- Save Your Customized Message:
- After making the necessary changes, confirm by tapping the Save icon in the upper-right corner to apply the changes to your auto-reply message.
Managing the ‘Do Not Reply’ List
To ensure that certain contacts or phone numbers do not receive your auto-replies, you can manage the ‘Do Not Reply’ List:
- Access the List:
- Tap the pencil icon to edit the Do Not Reply List.
- Block Phone Numbers:
- Enter individual phone numbers or a range of numbers you wish to block.
- For a single number, enter the full phone number, including the city and country code.
- To block a range of numbers, input the starting and ending numbers (e.g., +1 812 100 00 00 to +1 812 999 99 99).
- Managing Contacts:
- Select the contacts you want to block and confirm your choices.
- Review and Manage Blocked Numbers:
- Regularly review and manage the blocked numbers list. You can delete blocked contacts by long-pressing on a contact and selecting Delete.
Scheduling Auto Replies
Setting Auto Reply to turn ON and Off Manually
- Manually control your auto replies
-
- Turn auto replies ON or OFF as needed.
Setting Auto Reply by Time
- Adjust Time Settings:
-
- Access the time settings field where the default time is set for 2 hours.
- Modify the start and end times as needed by tapping the respective time fields.
Setting Auto Reply by Dates
- Configure Date Settings:
- The start and end dates are preset to the current date. These can be adjusted by tapping the date fields.
- Set the specific times for the auto reply to activate on the chosen start date and deactivate on the end date.
Setting Auto Reply by Weekdays
- Select Weekdays:
- Choose which days of the week you want the auto reply to be active by checking the appropriate boxes.
- To have the auto reply occur on a weekly basis, enable the “repeat weekly” option.
- Specify the times for activation and deactivation. For instance, if set for Monday from 7 PM, the end time could be set to 7 AM on Tuesday, ensuring the auto reply turns off the following morning.
Turning Auto Replies ON / OFF
- Activating Auto Reply for Future Use:
- Enable the auto reply to activate at a later time, which will place it into “waiting mode.”
- Immediate Activation of Auto Reply:
- To have the auto reply start immediately, activate it to switch to “active mode,” highlighted by a light blue background on your screen.
Notification Icons for Auto Reply Status
- Active Auto Reply Icon:
- An arrow-shaped icon filled in color appears in the device’s notification bar to indicate that the Auto Reply is active and running. The notification will display which auto reply is currently engaged.
- Waiting Auto Reply Icon:
- An outlined arrow-shaped icon signifies that the auto reply is set but waiting to activate at the scheduled time or under the defined conditions. This helps ensure that the app remains active in the background, preventing it from being closed by system optimizations or third-party apps.
Granting Access to Notifications for Enhanced Functionality
- Enabling Notification Access:
- It’s essential to allow notification access for auto replies to function correctly with social messaging apps.
- Selecting the Auto Reply App in Device Settings:
- Browse through the list of apps in your device settings to select and set up the Keyword based AutoResponder App for notification access.
- Authorizing Notification Access:
- Tap the “Allow” button to permit the app to display notifications, ensuring that auto replies are executed seamlessly.
Settings: Auto Replies Configuration
Navigate to the app menu and select ‘Settings’ to customize various options.
- Theme Customization:
- Change the theme to Dark, Light, or use the system default setting.
SMS General Reply Rules
- Single Reply Restriction:
- Ensure that only one reply is sent per contact during an active auto reply session.
- Reply Delay Configuration:
- Implement a delay before responding to a subsequent message from the same number.
SMS Auto Reply Rules
- Reply to Contacts Only:
- Configure the app to send auto replies exclusively to saved contacts.
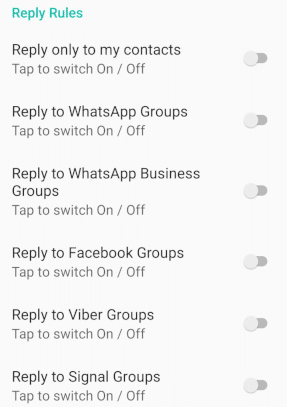
Social Messenger Rules
- Group Message Replies:
- Customize settings to reply to messages received in groups across various platforms like WhatsApp, Facebook, Viber, and Signal.
Managing Auto Replies Reports
Accessing and Managing Reports
- Accessing Reports:
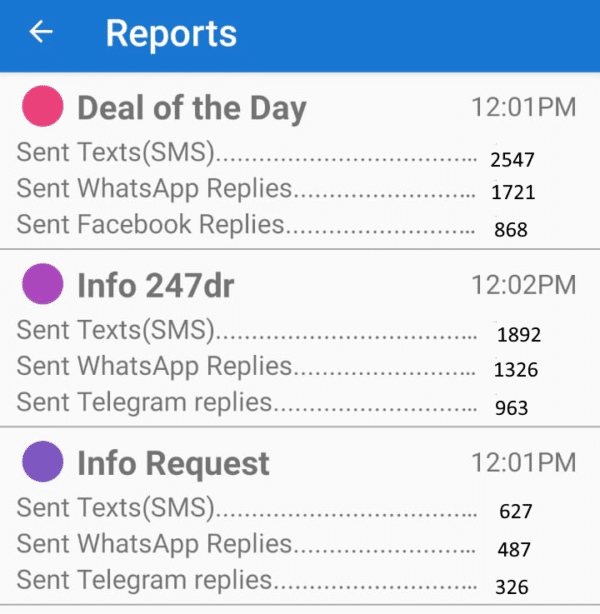
- Navigate to the main screen of the app and select “Reports” or access “Sent Messages Reports” from the app’s menu to view all available reports.
- Viewing Detailed Reports:
- Click on any report to expand and view detailed information, including who contacted you, Auto Reply Name, and the communication channel used during the period your auto reply was active.
Exporting Data from Reports
- Exporting Auto Replies Data:
- To export data related to auto replies, press the “Export” button located within the report view.
- Specify a file name for the export file and confirm the save location to complete the export process.
- Exporting Phone Numbers:
- Similarly, to export a list of auto replies, tap the “Export” button within the phone number report section.
- Enter a desired file name and choose a directory to save the exported file.
How to Transfer Files from Android to PC
Follow the steps below to transfer files between your Android device and your PC.
Step 1: Connect Your Android Device to Your PC
- Use a USB data cable to connect your Android device to your computer.
- Once connected, you will see a pop-up notification on your phone.
Step 2: Enable USB Storage on Your Android Device
- Open the notification panel on your Android device.
- Tap the “USB connected” notification.
- Next, tap on “Turn on USB Storage” and then tap “OK” to enable file transfer mode.
Step 3: Open File Transfer Window on Your Computer
- A File Transfer window should automatically open on your computer.
- If the window doesn’t open, go to Start > Computer (or This PC in Windows 10/11), and double-click on your Android device listed under Devices and drives.
Step 4: Browse and Transfer Files
- Once your phone is connected, browse the device to locate the KeywordMarketingAutoResponder folder, or the folder where your files are stored.
- Drag and drop the files to any folder on your PC.
- Alternatively, you can right-click the desired file(s) and select Copy or press CTRL + C, then paste the files into any folder on your computer.
Now your files are safely stored on your PC and can be opened in Microsoft Excel or any other appropriate software.
Back Up Your Settings and Configuration
You can back up your app’s settings and configurations to Google Drive and restore them if you need to reinstall the app later.
How to Back Up:
- To back up your current settings, go to the app menu and select Back Up.
- If backup fails, try the following:
- Check Google Drive space: Ensure you have enough available space in your Google Drive account.
- Use Wi-Fi: If you’re using cellular data, switch to a Wi-Fi network for a more stable backup process.
How to Restore:
- Restore your app data, which includes configurations, settings, profiles, and more.
- To restore, ensure you’ve backed up the app data after January 2023. Restoring from a cloud backup requires Contacts permissions to access your Google account.
- Please note: After restoring, all profiles are deactivated and need to be manually reactivated.
If Restore Fails:
- Check Google Account and Phone Number: Ensure you’re restoring from the same Google account and phone number used for backup.
- Storage Space: Verify there’s enough space on your phone for the backup restoration.
- Google Play Services: Ensure Google Play services are installed on your device.
- Battery and Network: Make sure your phone is charged or plugged in and connected to a strong, stable network (preferably Wi-Fi).
Effective Bundle of Keyword-Based Autoresponder with Call Auto Reply App
Combine Keyword-Based Autoresponder with the Call Auto Reply App to create a seamless, automated communication experience. You can reply to missed calls and provide customers with instant access to essential information by including a list of keywords in your “not available” message.
For Example:
Here’s how you can use SMS keywords effectively:
Message Example: “We are busy right now, but we will get back to you later. Meanwhile, you can send one of the following keywords to get more information:
- #list – To get a list of our services
- #demo – To get a link to the demo
- #promo – To receive a promo code
- #map – To get our location
- #product – To get a list of products
- #video – To get a product video
- and more…”
Building a Chain of Keywords:
At the end of each automated reply message, encourage customers to interact further by using additional SMS keywords to form a “chain” of responses.
For example:
- Keyword: #demo Message: Tap the link to get the requested demo. You can also send:
- #promo to receive a promo code.
- #video to get a video of our services.
By pairing SMS keyword campaigns with automated replies, you can deliver valuable information to your customers, improve engagement, and enhance customer satisfaction—all while saving time and resources.

